
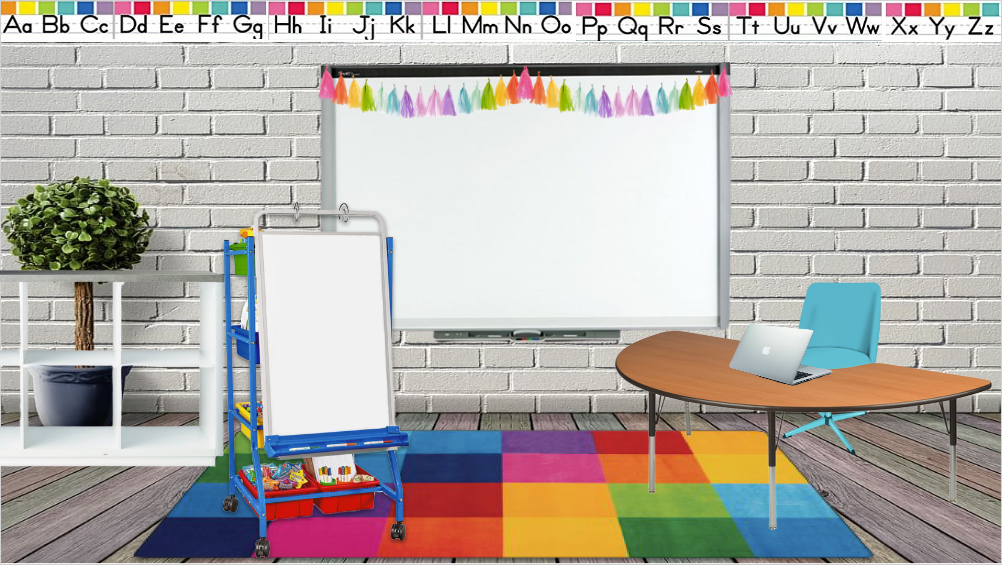
So many of the teachers around the country are not returning to in-person instruction and instead are doing their teaching virtually. At the end of the 2019-20 school year I discovered Virtual Classrooms and it was a GAME changer!! So I am going to go step by step on how to create your own classroom, add furniture (removing the background, i.e. the white or checkered around the image that you don’t want), embed videos, add your bitmoji, and include clickable links (links to websites, links to other google slides, links to assignments). It’s going to be a wild ride… so hang tight!
Making a Classroom:
Open a New Google Slide (Google’s version of a Powerpoint), add a background by clicking Background (purple), then you can choose a Color but if you’d like it to look like a real classroom, click Choose Image (blue):

Then you will search: Wall Floor Background (yellow), make sure your search is on Google Image Search (green), find the image you would use, then click insert (orange):

And Voila a classroom background!

Now to Add Furniture:
Click insert (pink), click image (purple), and click Search the Web (purple). Then a screen will pop up – search whatever furniture you’d like to add but make sure you use the word TRANSPARENT in the search. This will help bring up pictures that don’t have a background to them (making it easier & faster to add them to your classroom).

When I search for “Transparent Smart Board” in the search board, let’s be honest, the options weren’t great. BUT you can also open up a new tab and use the real google image search, so that’s what I did. I made sure that I still search using the word: TRANSPARENT.

BUT the Smart Board that I liked still had the checkered background… no worries, there is an easy solution to this problem! Remove the Background: First you need to download the image you want that has the background (I just downloaded it and left it waiting to be opened at the bottom of my screen (blue) so that it was easy to find/drag to where I needed. Then I opened another tab at the top of my browser and went to the website: Remove.bg I dragged the photo (blue) right to the UPLOAD button right on their home page.

Then my Smart Board magically didn’t have a checkered background anymore… Winning!! Just download the new image back to your computer, then add it to your Virtual Classroom Slide:

I went through the same process to add all the rest of my furniture & details/decorations!
If you want to Add EMBEDDED Videos (that means the kids will SEE the video right in your classroom, not a link to bring them to another website, etc.) it is SUPER easy! Go back up to the top of your Google Slide, click Insert (green), then Video (yellow) and menu will pop up, you have 2 options from here: #1 use this pop up to search for what you’re looking for using some key words (I search: GoNoodle Moose & I was looking for the Moose-ta-cha, which ended up being the first choice, win!) OR #2 you can find the video you want on youtube & just copy & paste the link into the search board on the pop up & get the EXACT video you wanted. Either way works great! Then just click Select (pink) when you found what you want!

Then your video will pop onto your screen, you can adjust the size, move it around the screen & find the perfect spot. If you press the Format options (or double click the outside of the video after you have it highlighted) then the format bar will pop up on the right side. Here you can change where the clip starts and stops (if you don’t want it to play the ENTIRE clip and just want a portion of it, this is a GREAT option!). You can also click Autoplay when presenting – which means when the kids click to this screen the video will automatically play (instead of having the play graphic pop up on the video to prompt students, this might be a great feature for younger students, so its one less thing they have to click/find).

If you want to Add Links to your Classroom (bring the students to a website you use, or another page of the Google Slide Presentation) this is GREAT and Easy!
First click on the image (using the same method as adding furniture to add the image you’d like to represent the link you’re sending them to) you would like to add the link to, I clicked on the Egg Guy (green) then you’ll click ctrl K (for PC) or Command K (for macs) (purple). A Link box will pop up, add the website you’d like the students to be sent to (blue) then click apply (light blue). It’s as easy as that!! Now anytime my students need to go to ReadingEggs.com they can just click the little Eggy guy and be brought straight there! This is great if you have a specific school website for a site (like Dreambox) or need to bring them to the log in page of something (that usually takes a few extra clicks), so linking it straight to the log in screen takes away 1+ extra step for them! It’s great!! Have fun linking ALL the websites you will be using throughout your time online. What’s great about that, is that any time you need that link, you can click on the image, copy it & the link copies with it whenever you paste it back into a different Google Slide!

If you want to Add a Google Assignment to your Virtual Classroom, you’ll first have to create the Google Slide or Google Doc that you want to link to (your assignment). Once you do that, on your assignment page you’ll click SHARE (green) on the upper right corner. A box will pop up, make sure your settings allow anyone with the link to access the page (yellow). Otherwise you are going to be bombarded with a million emails requesting access! Then copy the link (orange). Then you’ll going back to your Virtual Classroom, click on the image you want to link the assignment to – in this case I chose a Math Emoji. You’ll ctrl K (PC) or control K (Mac) (blue), paste the link to the assignment in the Link box, then click apply (pink). Then when you hoover over the Math Emoji, it will show a preview of what the assignment is (example is: Math 3.5).

Now we are going to Add your Bitmoji to make it even more personalized! If you don’t already have a Bitmoji (I had one on my iPhone) you will have to create a Bitmoji (and add/adjust the features to make it look the most like you!!). If you are on Google Chrome (highly suggest, especially since we are using Google Slides!) you can literally Google: Bitmoji Extension. It will be on the Google Chrome Web Store (blue), you will be looking for Bitmoji (green), then click Add to Chrome (pink), once it is added to your Chrome you will get a little notification (yellow) and the Bitmoji icon will be on the upper right corner (orange) for easy use!

If you haven’t made a Bitmoji yet, when you click on the icon, it will prompt you to create a Bitmoji (new), if you already have one, you can just log in and it will bring up your Bitmoji. To create your Bitmoji it will ask you a lot of very specific questions: eye color, eye shape, hair color, hair cut, lip shade, skin shade, body type…etc. It can get time consuming depending on how detailed you would like to be. BUT you can always go back and adjust your Bitmoji if you aren’t satisfied with how it turns out.
To add your Bitmoji to your classroom (after you’ve created it), just click the Bitmoji icon, then your Bitmoji menu will pop up. You can either search Bitmoji for a specific thing you’re looking for (i.e. mustache, waving, reading, etc) or you can scroll down to see what is popular right now and get inspired! At the bottom of the Bitmoji menu there is a Star (for popular Bitmoji poses), a waving hand (for Bitmojis saying Hi), Heart Eyes (Love Bitmojis), Smile (for Happy Bitmojis), Meh Face (for tired, unhappy, stressed Bitmojis), Celebration (for celebrating!). You can use this to help guide your searching.

If you are looking for a standing Bitmoji and you search: standing. These pop up:

So instead search: Pose. These options pop up:

I don’t know why…. but it’s REALLY helpful to know that!!!
Once you find the Bitmoji you want, you’ll have to right click it & copy, then Paste it onto your Virtual Classroom page. Once you add it to your page you can resize, reposition, etc. One thing I love doing is Flipping my Bitmoji – especially ones that are pointing! So in order to do that you’ll have to right click on your Bitmoji, click Rotate (orange), then Flip horizontally (yellow):

The FINAL and MOST IMPORTANT thing to do is to SHARE your finished Bitmoji Classroom so that your students can use it!! There are a few ways to do this. You can download it as a PDF (the links will all still work! Yay! And students will not be able to Move anything around, which is also a BIG YAY!!). File (pink), Download (purple) then PDF Document (.pdf) (blue).

Then you’ll just post it on your Google Classroom as a PDF attachment, right on the Stream OR you can post it in Classwork using the Add FILE option.

OR you can Publish it to the web: File (green), Publish to the web (yellow), a screen will pop up, click Publish (Orange).

Then it will ask you again: Are you sure you want to publish this selection? Click OK (pink) then it will go back to a similar screen as before titled: Publish to the web. Make sure to Copy the link (purple).

Then you are able to post the link in Google Classroom on your Stream, or Classwork, this time using the Add LINK. It will then open a new Tab, with the Clickable Virtual Classroom that you created!

I prefer this method because it allows you to continue to adjust and make changes to your Virtual Classroom and because it is published to the web it will UPDATE the link every time you make a change. That way you aren’t constantly downloading new PDFs of your classroom to post! Here is one I did for the color RED (day 2 of Kindergarten). It will open up in a new tab, and you can venture around my room, even if I continue to add things, it will automatically update without having to change the link!
Good Luck on your Virtual Classroom and if you have any questions, or tips please leave a comment below! Thank you!!!

I missed the presentation because your volume was muted and you was going in and out. Where do I click on this site to hear it all over again
LikeLike
Thank you SO much for tuning in! Unfortunately (as you know) the microphone went out – so I don’t have a viable recording. Yesterday I forgot to hit record… I apologize! BUT I will be giving the presentation again at 1:30 and tomorrow at 10:15 – so hopefully (cross fingers) I will be able to get a good recording of it and I’ll make sure I post it up on my Googlepalooza page!!
LikeLike
Hi I was at your 1:30 class. I did enjoy your class and look forward to using this idea for my classroom. Thank you for taking the time to teach us.
LikeLike
I thought your webinar yesterday was awesome and was wondering how did you make the polka dots that had all your stuff on it? I was thinking of doing that for each school day, so caregivers knew to just click on Monday for the day’s activities:) Also, will you share again about the banner the code for taking the gray tint off and also when you copy your link of your virtual classroom to save as a pdf, do you have to download first and exit out of google mail? Someone said if you have made a virtual classroom using google slides from your cps gmail, then parents could see your information and check your email and stuff (don’t know how true it is but thought I would ask :)) thank you
LikeLike
Hey Julie (I sent you an email with all the answers to your questions). But I thought I would share the Polka dots incase anyone else was interested! Bethany Barr from RaisetheBarr created them and they are FABULOUS!! https://docs.google.com/presentation/d/1MSZVeLCPJWGKkV70mNBcuz852TS35xt1Iev2o7Cht9Q/edit?usp=copy Have fun!!
LikeLike
Hello. I also enjoyed your presentation….. I was really confident about doing this, but I am having trouble getting images from google. I did finally find a smart board that would work, but I’m wondering what I’m doing wrong with the google search. I can’t find a reading table, and the chair I have is facing the wrong way. Any tips on google image searching?
LikeLike
I’m having the same problems with rugs, furniture, etc. I’d love to know where you found your alphabet banner. (I was in the muted presentation and was unable to attend a later session.)
LikeLike
Yes, completely understandable!! Honestly if you go to one of the Facebook Pages I suggested (Bitmoji Craze for Educators is my favorite) you can find SO MANY teachers who have uploaded their classrooms and the easiest way to “collect” things you’d like to add to your room is by copying & pasting them from other teachers rooms – they’ve done the hard work of getting rid of the backgrounds on images, etc. So it makes it super fast/easy that way! (That’s what I ended up doing for my carpet!! I couldn’t find “Rainbow carpet” or “Colorful Carpet” that I liked, so I found one off of someone else’s AMAZING classroom that they so GRACIOUSLY shared with the facebook group!! I LOVE teacher collaboration!! Hope that helps!! Here is a Copy of my slide – feel free to copy & paste anything you need from here: https://docs.google.com/presentation/d/1TFLJGtYcvQx3UfAe2WO3Njp75VhMxAxbQAR-xXLMaSo/edit?usp=copy
LikeLike