
I am have been tinkering with how to create a Google Site. So here is my step by step directions (with pictures!) to try and help make it easy for you to try to make a Google Site too!! I am going to be using my Google Site as a way for my students & parents to easily access links to apps/website I use daily, to show off student work (Virtual Bulletin Board), easily email me with questions, post my Virtual Classroom (that I will use to begin each day for my Morning Meeting), and general information parents/students will need easily!
If you’d like to explore my site (I create a Duplicate Site for you to explore) just click here! Not all the links are working yet, but I will continue to add them when I have completed the materials! Enjoy exploring!
To begin, You’ll need to click on your Google Apps (the 3×3 boxes up near your Name/Profile Picture – pink) then click on Sites (orange). It will bring your to the starting page for Google Sites, now click on the + to create a NEW site. You can choose to use a template, but I found it easier for me to create exactly what I needed, instead of trying to. make what I need fit an already created template. Plus its SUPER easy to adjust the site, no worries, you can do this!

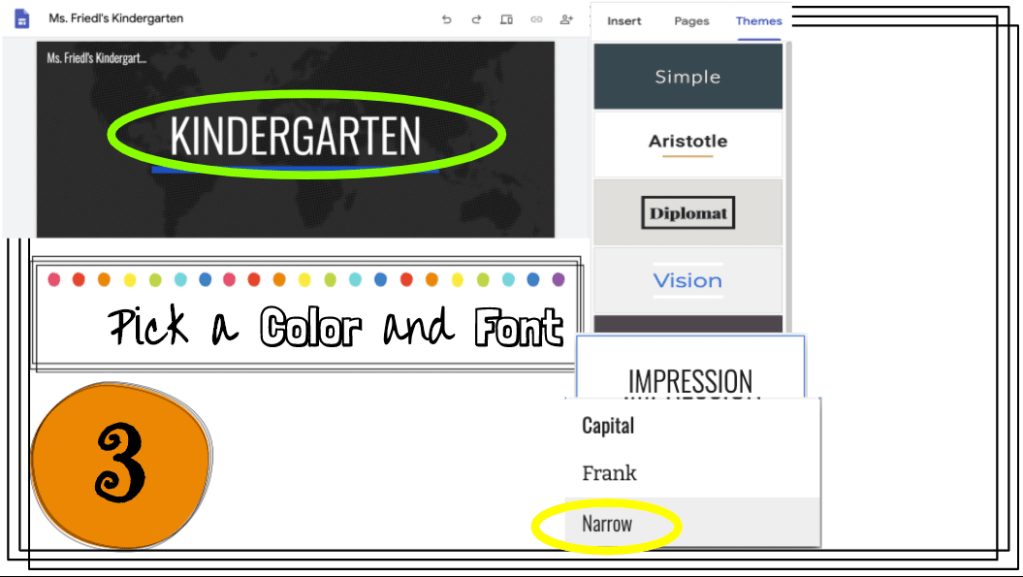
Next you will name it (green) and pick a “theme” (blue)!

The theme allows you to pick you accent color. This color will be the underline, and will appear as an accent within your site. So I just picked a pretty blue… but you do you!

Then you can adjust the font style if you’d like (yellow), it will change the font throughout the site, so I choose Narrow as a easily readable font (green) for my students/parents.
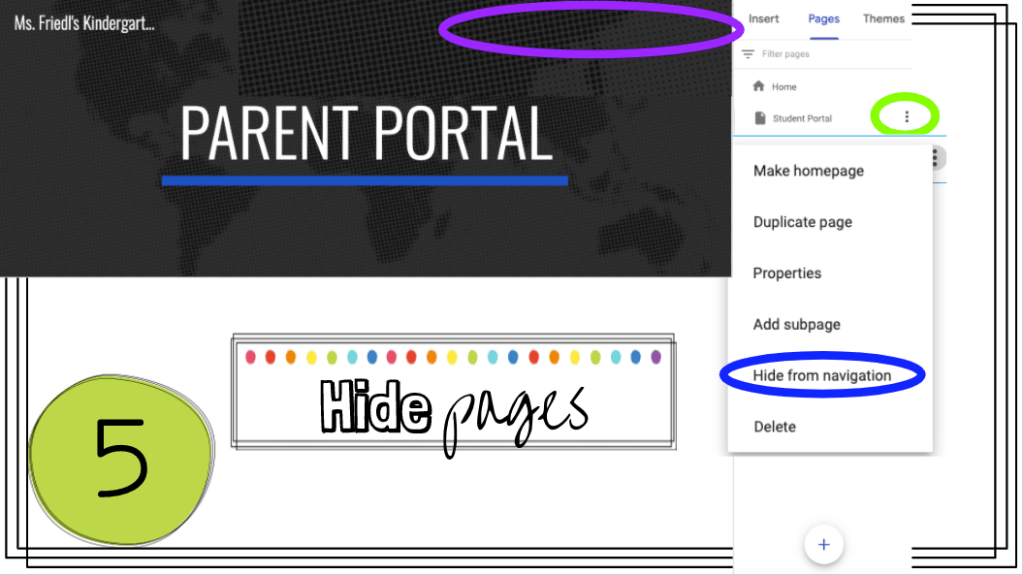
Now we can move onto creating the different pages you’ll want students/parents to have access to! On the side bar, you’ll want to select Pages (blue), then (I deleted the pages that were currently there, if there are any… ). Then select the + at the bottom (purple), a New Page pop-up will appear, you will Name your new page (pink) then click Done (orange). Each page you create will be added to the top bar (yellow) for students/parents to click on to navigate between pages.

If you’re like me, I didn’t want the students/parents to use that navigation method, I’m going to add buttons for easier “surfing”. So I touched the 3 dots (green) next to each of the Pages Names and selected Hide from Navigation (blue) and just like that they disappeared (purple). Don’t worry, I’ll show you an easy way for parents/students to navigate to those pages, promise! But if you’d like to keep those buttons up at the top, go for it!!
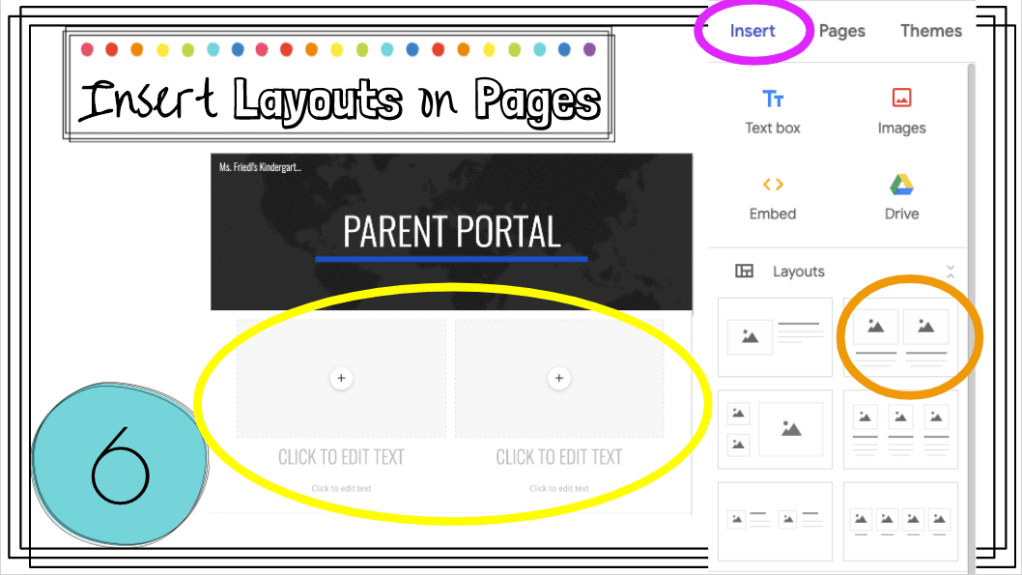
Now we are going to Insert a Layout onto the pages. Make sure you are on the Page you’d like to add your layout to – you can click the different pages to edit via the pages tab (where we were in the picture above). I accidentally pressed the Parent Portal Page to play around with – but I promise its the exact same on the home page – just make sure you click Home on the Pages tab!
Once you are on the correct tab – then click insert (pink), touch which kind of layout you’d like. I decided I just wanted 2 buttons (orange) on the Home Page – one to link to the Parent Portal and one to link to the Student Portal. Once you decide which layout you’d like it will appear under your header (yellow).
Now you can add a regular picture, and text to it if you’d like. But I have Kindergarten students and I wanted to make things super easy! So I downloaded some Buttons from Bethany Barr (she’s Amazing!!) and they are FREE! Anyways… in order to turn them into “buttons” you will need to copy & paste them into a Word Doc or PowerPoint (I don’t know why… but it wont work in Google Slides). Anyways, copy & paste the button you’d like. You can add a background if you’d like (a solid color or even a shiplap/brick/pattern… etc). OR you can create your very own “button” (I’ll make a post about how to do this in a little bit). Anyways… You are going to want to select everything you want as your button, right click, select Save as Picture… (orange) then Save it to your computer – name it something that will help you remember/find it quickly (yellow) and Save (green). I like to save mine right to my Desktop for easy retrieval.

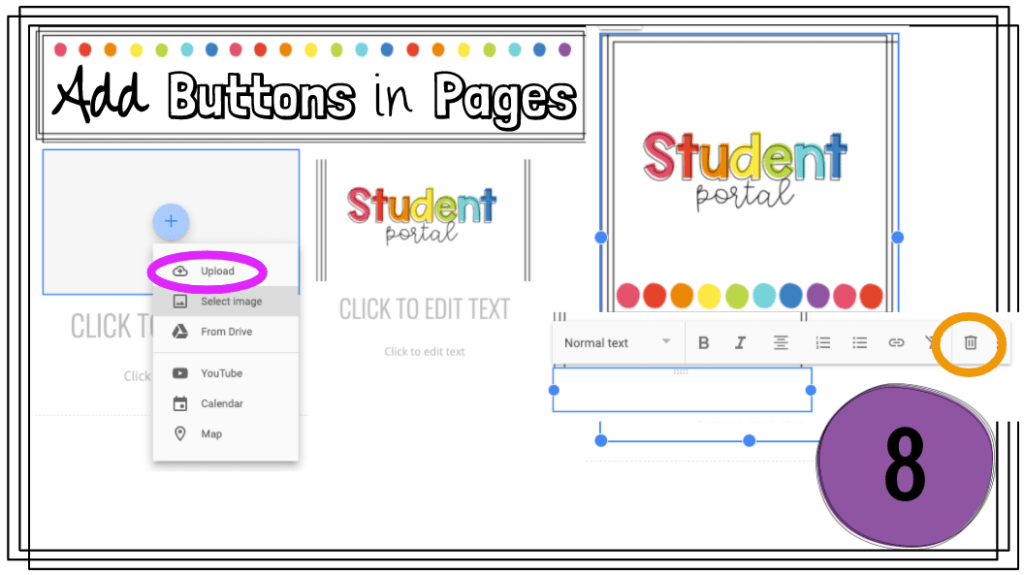
After you create & save all your buttons, go back to your Google Sites page, you are going to select the + where you want the button to go, click Upload (pink), then the picture will appear. But it might be cut off (like the middle picture), so just click on it and use the blue circles/lines to drag it to fit. I didn’t want to use the text boxes below the picture so I right clicked on them and deleted them (orange).
Once you add your buttons to the Home Page you’ll continue to add your buttons (in the same way – creating them in a Word Doc or PowerPoint).
Now my students/parents only have 2 options on the home page – either Student Portal or Parent Portal (yellow). BUT there is still this giant Header that isn’t the cutest… so let’s work on that!

If you click/hover over the header a Trashcan (green) will appear on the left. Click on that to get rid of it. We will be replacing it with a cuter image!

On the right you are going to want to make sure you are still on the Insert Tab (near the top) then click on Placeholder (blue) and a square will pop onto your page (purple).

You are going to click and drag that Placeholder box to the top of your Page (purple) – this will now be your new header!

You can again create a cute header (use your Bitmoji Virtual Classroom, Google Classroom Header, etc) or use one from Bethany (pictured below). Once you insert the image you created as your header – you will need to adjust it (green) by pulling on the blue circles. After you make it the size you want press the square-ish button (orange) to make the whole image “fit”. Then you can drag it to center it on the page (or put it on the side, you do you! lol).

Now for adding LINKS to those buttons. Once you create the buttons you are going to want to either it link the button to another page on your Google Site OR some Google Slides/websites.
First we will start with the little bit more tricky one: Linking a Google Slide Presentation. First you’ll go to the Google Slide deck you’d like to link. Click File (blue), Publish to the Web (Purple) then it’ll ask if you want to publish, click ok, then COPY the link (larger purple).

After you copy the link, you can open a new tab at the top of your web browser, insert the copied web address and you will be able to see your slides now published on the web! This is necessary because you want the parents/students to be able to see & click through the slides WITHOUT moving objects, deleting things, etc!!! You are going to want to click onto the exact slide you want them to have access to when they click the button on your Site. In this case, I want them to Meet the Teacher.

To add that link to one of your buttons on your Google Site, you would click the desired button – then click the link (looks like a math link) that pops up above it, then add the web address to box (orange) and click apply. Now when a parent clicks on Meet the Teacher it will bring them to the page from my Google Slide.

Just continue doing this until ALL of your buttons are linked. If you would like to link your email – just add your email address to the Link & it will open up their email & create a message, address to you! It’s that easy!
BIG Thanks to: Bethany Barr!! I LOVE her buttons (the graphics she created) and they can be found here (for free!!) and if you are more of a video watcher, she created a youtube video on how to create a Google Site that was really helpful, that can be found here.
If you have any questions or tips, please leave a comment below!!
